How To Fix a Frozen Shoulder
 Article by Lucas Rockwood


Do you have stiffness, pain, and limited range of motion in your shoulder joint? You might have adhesive capsulitis, aka frozen shoulder, and if so, this guide is for you.
Frozen shoulder often occurs after traumatic injury, surgery, or as a complication of conditions such as diabetes, thyroid disorders, and heart disease. It often appears in midlife and typically progresses through three stages: the freezing stage, where the shoulder becomes increasingly stiff and painful; the frozen stage, where the pain subsides but stiffness remains; and the thawing stage, where range of motion gradually returns.
Frozen shoulder commonly takes over a year to fully resolve and can take as long as three years with some people never fully regaining lost range of motion. Self-care corrective exercises are designed to help speed up the healing process. The simple, but effective, corrective exercise routine in this guide works on accelerating your healing journey and restoring good range of motion to your shoulder. It takes just a few minutes a day and can be done in bed before you get up and go to sleep.
Frozen Shoulder Anatomy
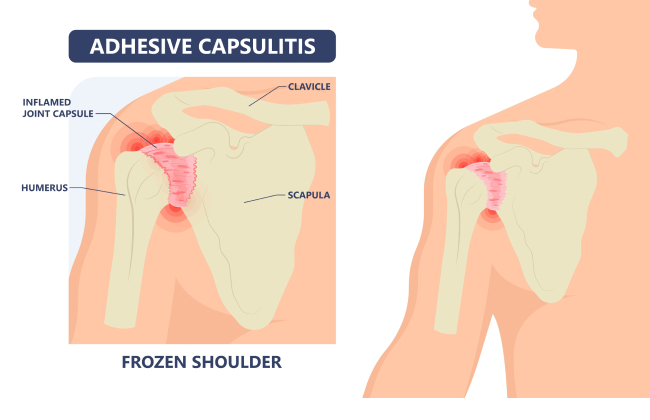

Frozen shoulder occurs when the synovial capsule surrounding your shoulder joint becomes thickened and inflamed, restricting movement. It commonly appears in midlife and often occurs after traumatic injuries, surgery, or as a complication of conditions such as diabetes, thyroid disorders, and heart disease.
Test Yourself
Not sure if you have a frozen shoulder? These range-of-motion tests will help you gauge whether one of your shoulders is frozen.
- Start by laterally rotating both arms (rotate them to the outside) – if your shoulder is frozen it will likely get stuck at around 30 degrees
- Next, raise both arms above your head – one arm will likely raise much higher than the other
- Finally, try abduction (opening your arms to the side) – again, the frozen side will often get stuck between 30 and certainly at 90 degrees, and you might start to compensate by sticking your hip out or elevating your shoulder
Corrective Exercises
When performing these exercises think of pain like guard rails, and when you feel it, back off one step and work from there. In terms of intensity, again err on the side of caution – four out of ten perceived intensity is usually a good starting point. Remember, pain reduction is a great sign of progress, but to “thaw” your frozen shoulder, it will often mean practicing continued corrective exercises long after the initial pain period subsides.
Windshield Wipers
This pose works on lateral rotation of your shoulder to the outside and medial rotation to the inside. Attempt to keep your elbows and your shoulders as still as possible throughout.
- Lie down, holding a soup can in each hand
- Bend your elbows at 90 degrees and place them on top of blocks or pillows at your sides
- Inhale and move your arms in a windshield wiper motion to the right. Exhale
- Inhale and windshield rotate your arms to the left. Exhale
- Repeat this process for five rounds in total, place your cans down and shake out your arms
- Remember, do not push into pain, stick to no more than a four out of ten intensity
Open/Close Doors
- Grab your cans, place your elbows in the same 90-degree position as the previous pose
- Rotate both shoulders to the outside as if opening doors
- Hold here with open doors for five breaths
- Slowly close the doors and wing your elbows out to the sides
- Return to centre, placing the cans at your sternum, hold here with closed doors
- Repeat five times, then slowly place your soup cans down, and gently shake out your arms
Shoulder Flexion
- Grab a belt, strap, or robe belt. Lie on your back, clasp the belt between your hands. You might need pillows or your headboard for support
- Inhale and slowly raise your arms until the belt is above your head
- Remember to only go as far as the point of discomfort and then take one step back
- Pause here, pulse for five breaths, then hold for three breaths
- Lower your arms down by your thighs, still holding the belt
- Inhale your arms back up to the point you just discovered
- Slowly exhale your arms back down
- Repeat five times, pausing at the top of the final round, breathe here
- Slowly lower your arms and gently shake them out
Shoulder Extension
This pose can feel really intense. Don’t go to a very intense place, even if your hands don’t even go past your waist.
- Grab the backs of your knees and make your way up to a seated position
- Grab the belt or strap behind you, find a place of tension and discomfort, then take one step back from the place of discomfort. Hold here for five breaths
- Slowly release your arms
Shoulder Abduction
- From a seated position, grab your soup cans
- Keep your arms straight, inhale, and gently extend them out to the sides with control
- You may find the place of discomfort quite quickly here, remember to take one step back
- Exhale, slowly lower your arms with control
- Repeat for five rounds in total, release the cans, and shake out your arms
Safety Disclaimer
This guide is for educational purposes only. Frozen shoulder symptoms can present in conjunction with other conditions. It’s always recommended that you see a doctor to rule out dislocation, a SLAP tear, or a rotator cuff injury before starting any self-care practices.
Want to Learn More?
- Science of Stretching 5-Day Program (on demand)
- YOGABODY YouTube Channel (free to subscribe)
- The Lucas Rockwood Show (podcast)


